If you want a website with up to 10 individual pages, plus a news section, then there is no need to hire a web designer* or produce a one-off, bespoke site. Instead, you can tailor the simple use of pages, posts and labels offered by Blogger to your own site for zero cost. Here's how.
The following websites have all been created by Studio 425 members using the guidelines below; The Boathouse Design Studio, The Flying Cloud Cafe, Apps Court Football Camp and of course Studio 425.
Step 1: Register with Blogger
I'll assume this is pretty straightforward. All you need is an email address. Once you are registered, click 'Create a blog' when looking at your dashboard and follow the steps until you have chosen a design template. You can make changes to your template, layout, blog name and even blog address later.
Step 2: Set up your page design
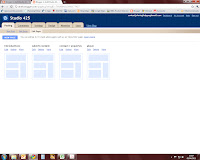
After applying a template, you will be presented with the 'Design' page, where you add widgets to your site. The image left shows the 'Design' page for the 425 site at the time of posting. The important widgets to add are 'pages' and 'labels'. I would suggest you remove all the other widgets that come as standard, otherwise, your site will look like a standard site, that you haven't done much to yourself.
Step 3: Decide on your content
Most blogs work by automatically placing recently uploaded information at the top of the page (in the 'blog posts' section as shown above). By creating 'pages' rather than 'posts', you can keep certain parts of your site visible, without them slipping down the page as more info is added. You can have up to 10 permanent pages. I suggest a combination of titles like 'About', 'Contact', 'Approach' or 'Philosophy', 'Client List' or 'Précis', 'Portfolio' and 'News'.
Step 3: Upload using 'pages' and 'posts' with 'labels'
 With the exception of 'News' and possibly 'Portfolio', all of the sections mentioned above should be added as 'pages'. To do this, click 'posting / edit pages / new page'. The user interface is pretty straightforward, with text, images and hyperlinks all easy to include. I'm assuming you are comfortable writing your own copy and getting your images into manageable file sizes.*
 You may like to rename the 'home' page as 'news', 'blog' or 'latest' in order to present your site as something different from a typical Blogger account. Remember, your most recent post will always appear on the default welcome page. If you do not want to post any news or blog updates, you can upload a single post, with everything else appearing on 'pages'. This way your single blog post will become a de facto welcome page.
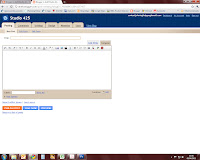
If you have a large portfolio to upload, I would, however, load these as posts. To do this, click 'new post', as shown opposite. Add your text and images in the usual way. However, this time, add some 'labels' to the upload. This helps search engines identify the content of the page and allow you to group similar pages together. You should try to re-use existing labels whenever it's appropriate and you can see what labels you've used elswhere by clicking 'show all' next to the labels box.
Once you have uploaded a couple of posts, go back to the 'Design' page and adjust the settings of your 'Labels' widget. You can see in my design layout, shown above, I've inserted three 'Labels' widgets and changed their titles to 'Disciplines' and 'Popoular Pages', leaving one as 'Labels'. Of these, the first two only include selected labels, while the last includes all labels, displayed as a word cloud. If you click on one of the labels on the published site, it takes you to a page listing all posts with that label. Experiment with different combinations of labels and headings until you have a neat set of links and are happy with your navigation
Step 4: Lose the Blogger look
The Blogger user interface assumes you want a simple chronological blog, whereas we are more interested in presenting a professional website, without the overheads of design or hosting costs. In order to disguise the humble origins of your site, I would suggest playing with all the settings on the 'Design' page, particularly those for 'Blog Posts'. Ask yourself, would you put in a particular function if it did not automatically appear? If the answer is no, then you should remove it. Finally, to really disguise the Blogger look you need a bespoke domain name. On to . . .
Step 5: Using a custom domain name
Blogger automatically creates addresses based on the domain 'something-you-chose.blogspot.com', which is a dead give away that its a budget designed and operated site. If you want a custom domain name like 'something-you-chose.com' or 'something-you-chose.co.uk', then you have two options. Either you buy a domain direct from Blogger, in which case they automatically divert your traffic or you buy a cheaper domain elsewhere and change your domain's DNS settings yourself. Blogger has advice on how to do this, which can be found here.
Step 6: Spread the word
Finally, you'll need people to find you site. Have look at my article on search engine optimisation here, which introduces techniques for getting noticed by search engines. When you are happy with the site, let us know we'll be happy to provide a link into your work.
Good luck
--------
*Of course, if you do want someone else to do it for you, we'd be happy to oblige. Just send an email to the usual address, studio425@london.com and we'll be in touch

